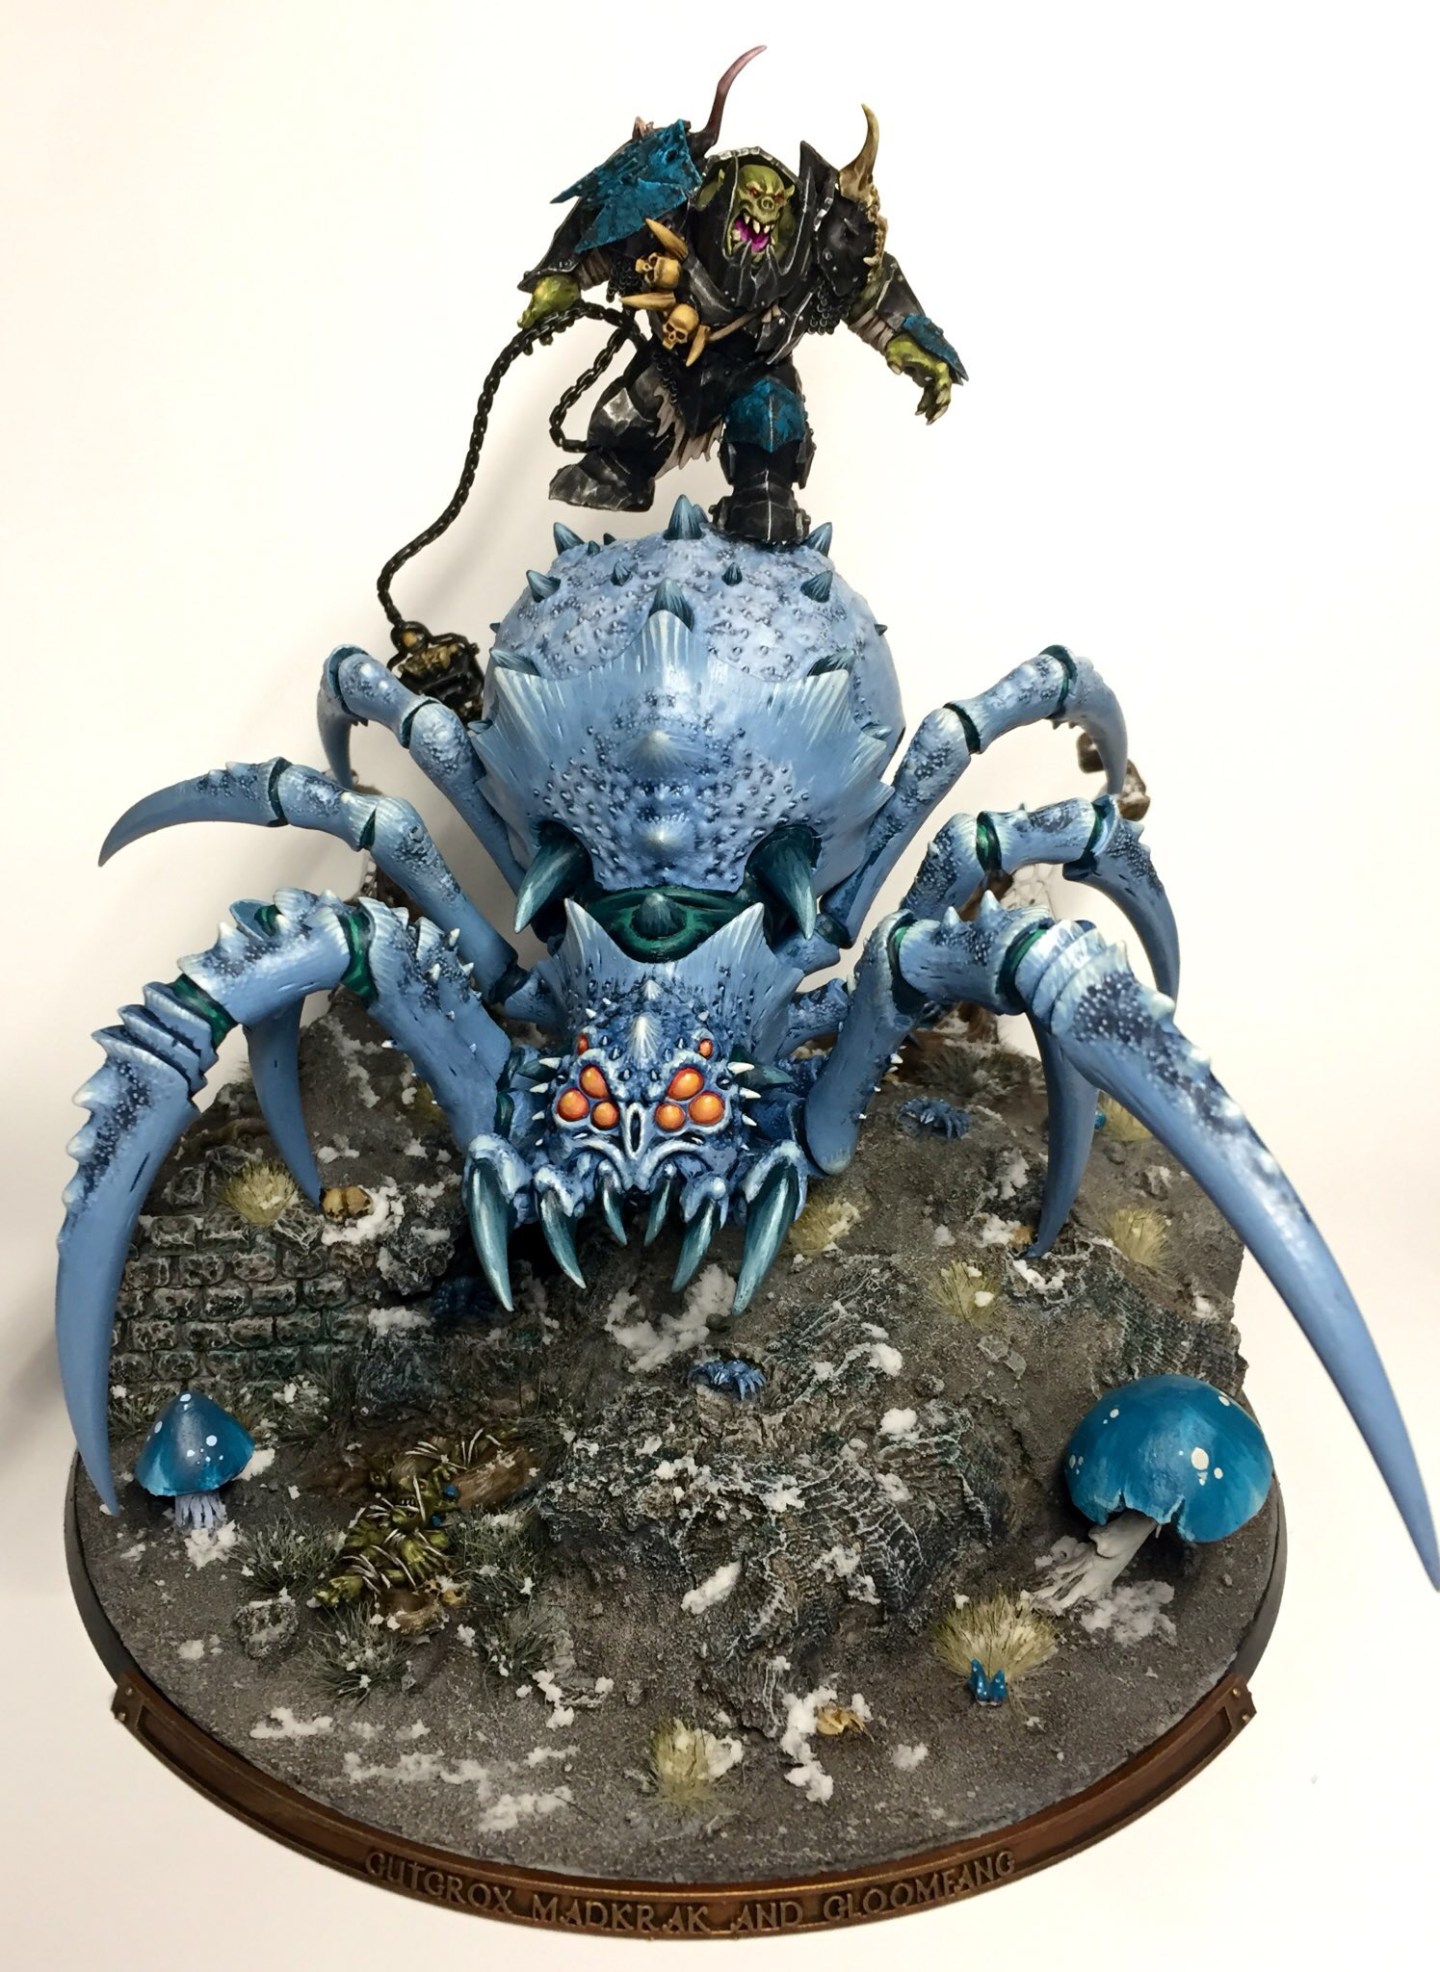
I recently finished off a project borne out of a dislike of the existing Maw Krusha model, coupled with a bit of a weird idea.
When I started I knew three things:
- The existing Maw Krusha model is horrible and looks like a cabbage.
- I wanted to paint a giant spider.
- I wanted to be able to use a megaboss on “maw krusha” and have the option to take him on foot if required. Save some pennies.
And out of that, the idea for a megaboss surfing on the back of a giant spider materialised and I got to work.
The Base
I love building bases, if this were a hobby of just building bases I would happy.
To get started I used cork bark glued straight on to the base. Cork bark has a nice texture to it that looks like volcanic, gnarly, rock when painted up. When you buy it – do not buy it used! People use it for real life spider nests and lizard terrarium features… You can get nasties along with it if you buy it off eBay etc. Also worth noting that when you cut or saw it you should wear a mask as it can carry a pathogen distributing fungus. Not cool. Other than that it’s really good though. Honest.
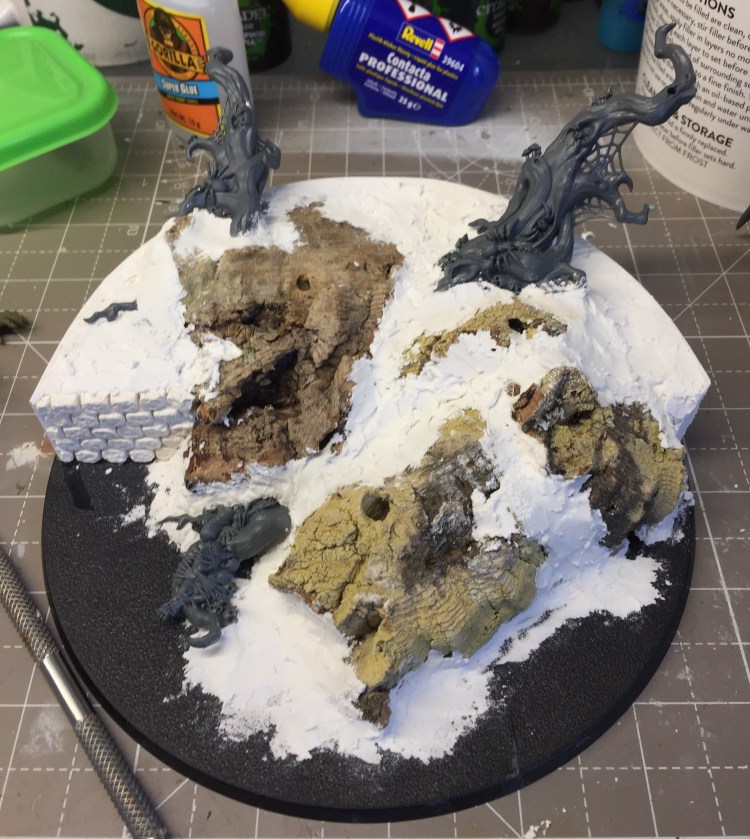
I then got my trusty wall filler and went to town sculpting some ground between the rocks, added a few trees from the spider kit and built a wall. I’ll cover building the wall in a future article.
For texturing the ground I used my trusty mixture of different particle size sand and small stones. The mushrooms were left over from my Moonclan Grots project and work really well for the Ironjawz as well so I have been including them on the larger models for the army.
The giant spider kit comes with a bunch of smaller spiders, so I added some on the base to give it a few more pieces of interest – the space is quite big so it can take more than average.


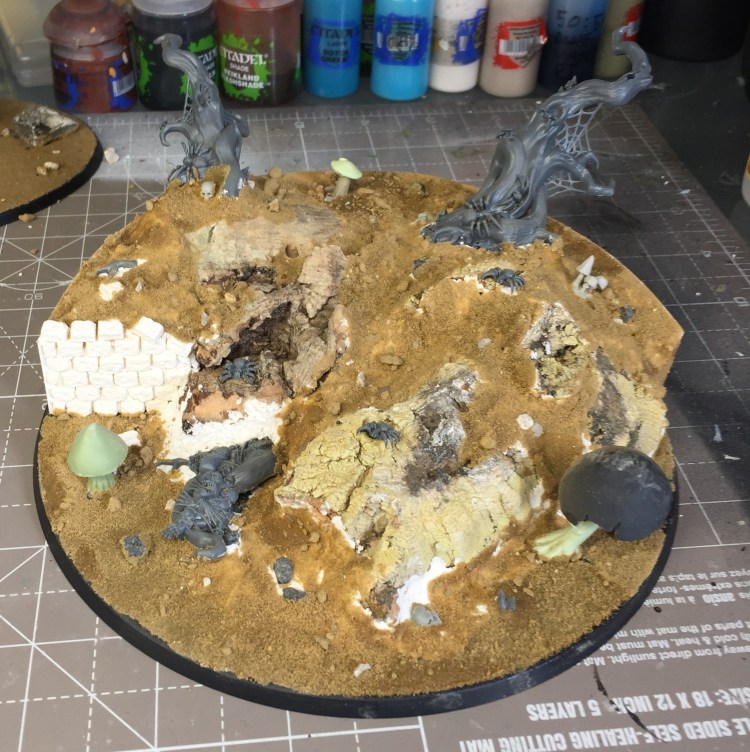
Blasting down some base colours was easy enough, there were a lot of washes involved at this stage. I threw some blue into the mix in places to give it a frosty feel.
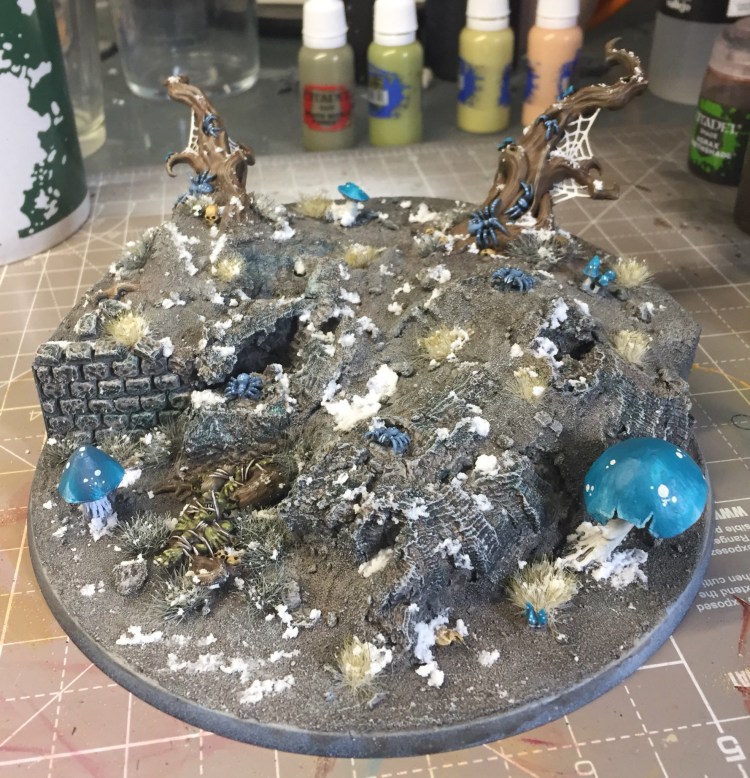
I decorated with the finishing touches to match the rest of my Ironjawz army; small patches of snow and matching tufts.
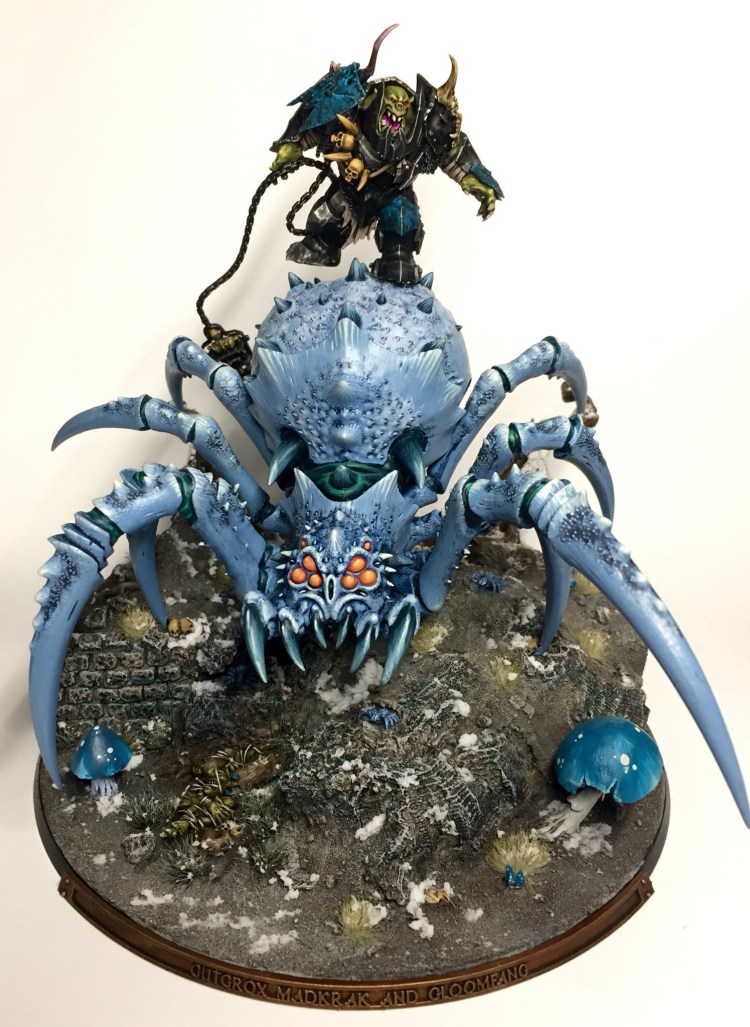
The Rider – Gutgrox Madkrak
For the Megaboss himself I wanted the option to use him on foot, so needed to magnetise him to the spider. I did experiment with it in a few different positions, and with and without the platform that comes with the spider kit, but time constraints meant this wasn’t really my focus and ultimately I just wanted to get him attached.
I also wanted to make some modifications to the shoulder piece as I already have one megaboss with the giant skull, so wanted to be able to mix it up. I went for one of the shields from the boyz kit and a daemon skull. Removing the giant skull was reasonably easy, and once the other pieces were attached in its place it was only a case of filling the gaps with greenstuff.
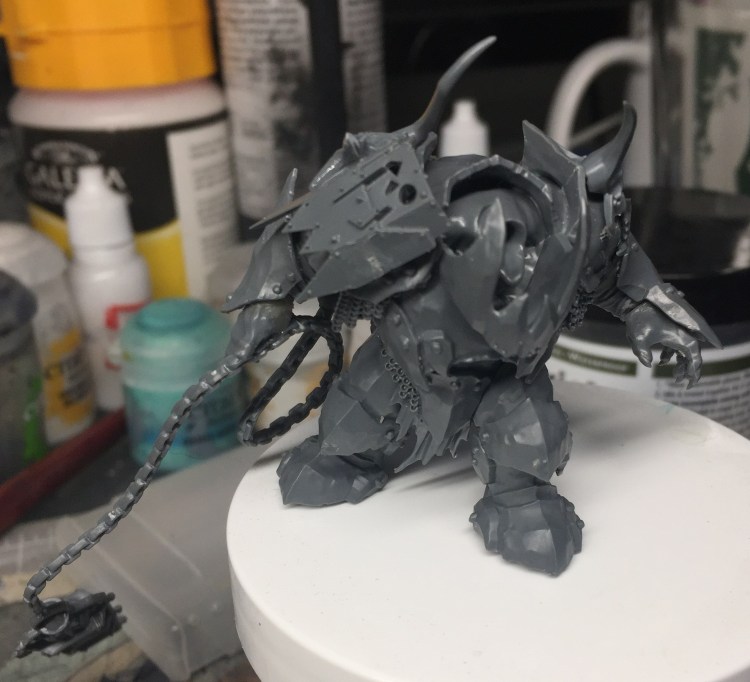
With him being on foot I also magnetised the hand options at this point, both can be switched out for alternatives.
For the paint job, I already have a well established theme for my Ironjawz; black metal armour with blue accents. I wanted to try something a little different for this one to make him stand out though, so decided to try out some Vallejo chipping medium.
The usage of this is quite simple, you put down the colour you want below and then apply a matt varnish followed by the chipping medium. Over the chipping medium you apply your top colours. Once this is fully dry you can take something small, I used an unfolded paperclip, apply a little water and then scratch away at the top layer of paint. The water reactcs with the chipping medium below and causes the paint to lift away quite easily.
Once you are done applying your scratches, just apply some more matt varnish over the top to seal it all in and stop the chipping medium reacting anymore. Once this was done I applied a nuln oil wash to give it another layer of depth.
For a first attempt at the method I was quite pleased with the results.


The rest of the model was completed using my standard Ironjawz recipe.
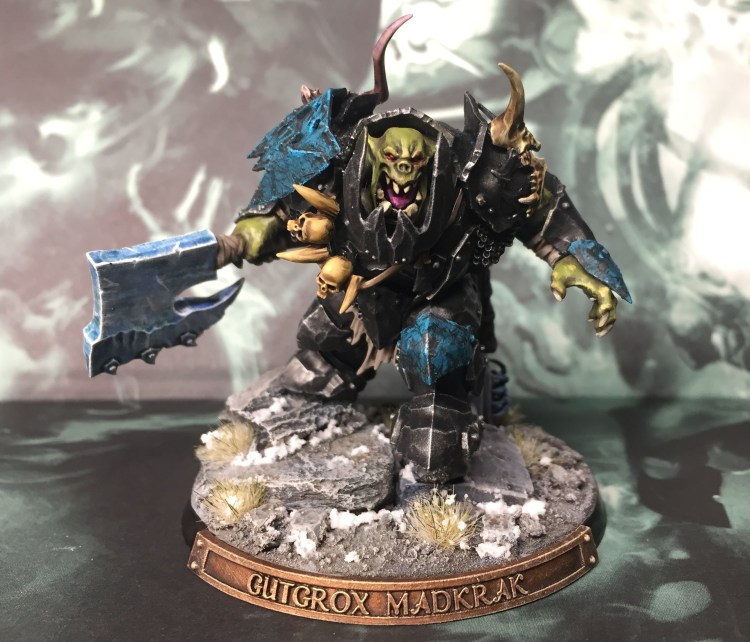
Here he is on his standalone base for when I need him to axe some serious questions of people.
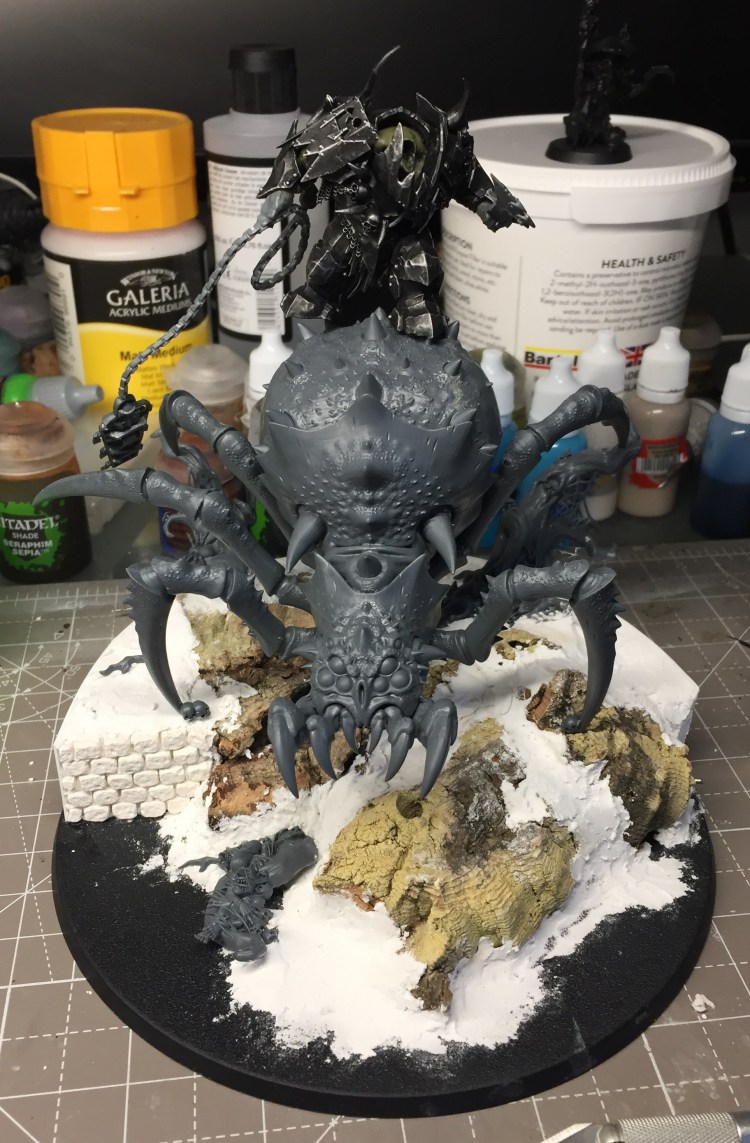
The Spider – Gloomfang
So on to the spider.
The first issue to tackle was getting the rider magnetised on the back. This was a larger pain than I had originally thought, there wasn’t a position on the back where both feet would be on the spider in such a way that looked anywhere near right, after many attempts, 3 different magnets being drilled into the spider and then removed and covered up I eventually decided that one foot would have to be enough and went with it.
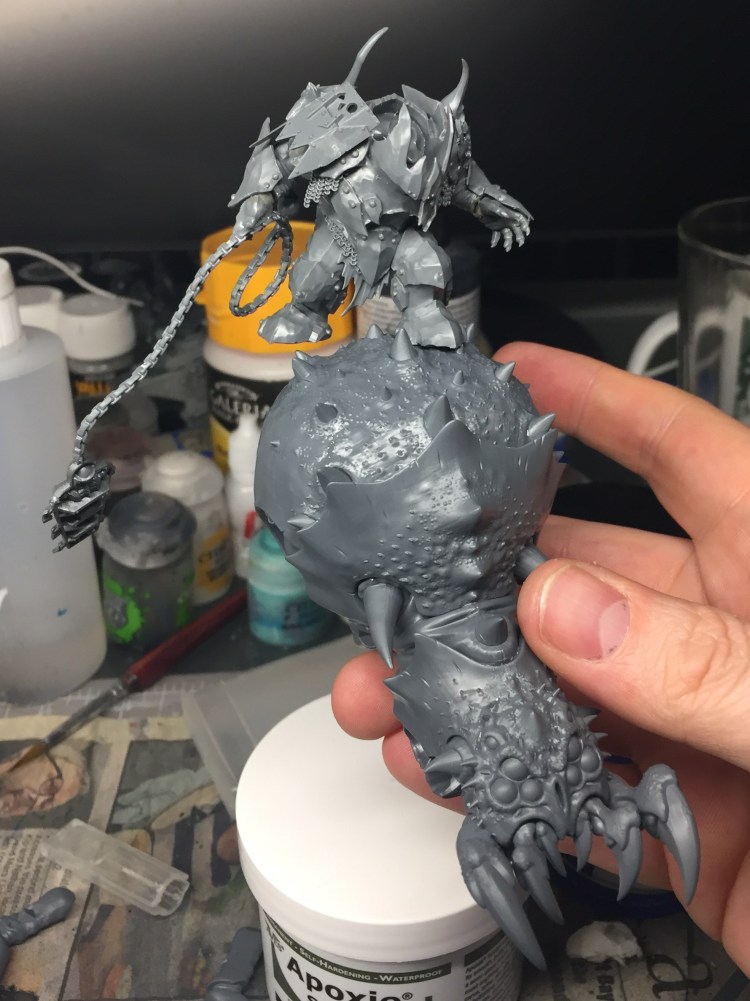
There’s a magnet in the foot, one on the spider, and there’s also a pin that goes into a hole on the back of the spider for a bit more stability as the rider was spinning with it. Ultimately at this point I should have just accepted defeat and glued him on properly and forgone magnetisation, but there we go. Mistakes were made.
Talking of mistakes…
I needed to get the legs attached so I could know their position was going to work on the base, and in relation to the rider position on the back of the spider, and his chain weapon. For some reason I decided glueing them on was a great idea at this point…. Which made painting later on ridiculously awkward.
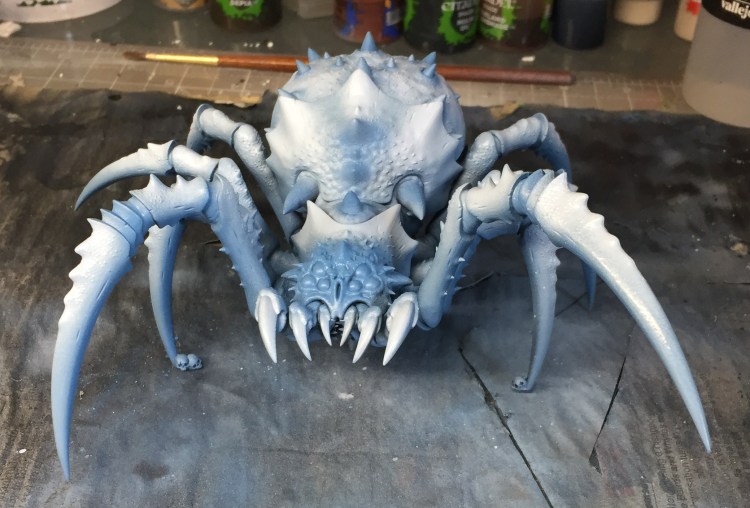
I used the airbrush to blast down base colours, get an idea for where the highlights were going to be and give myself something to work from.
This is where the photos get a little non-existant, so I will give a rough account of how I painted this.
I used a mixture of blue wash in various states of thinned and applied it in places that required it, in the gaps and across the textured areas on the legs and body. I then drybrushed lightly the textured areas to bring out the detail.
Following that I used the base colours thinned down to bring the colours back into it and added the highlights where required.
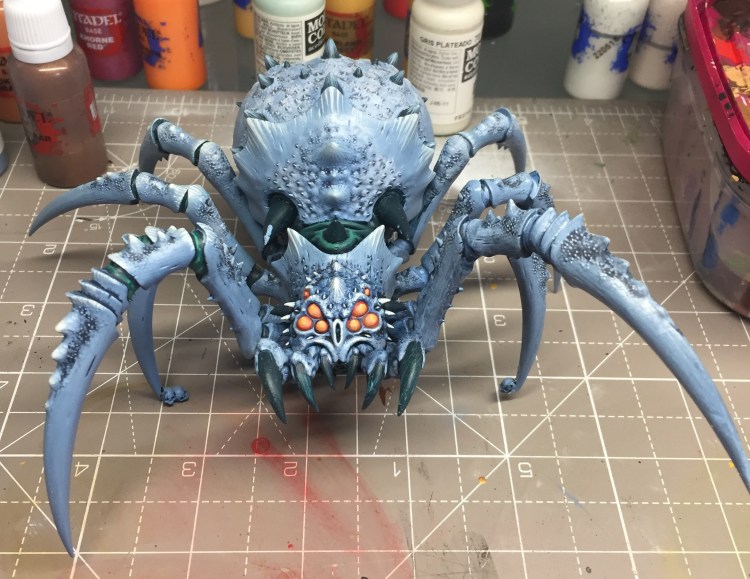
The underside and fleshy bits were all painted darker and then highlighted. There’s so few of these that I didn’t really pay too much attention to them.
Spikes and fangs were base coated and then highlighted with the base colour lightened to varying degrees, I paid most attention to the fangs on the front so I could get some highlights in places that made them look reasonably shiny and sharp.
I wanted the eyes to contrast the rest of the model so went with an orange for them and then highlighted the face more extensively than elsewhere to really try and make it all pop.
Then it was just a case of putting it all together.
The Learnings
Overall I think the project came out reasonably well, if I were to tackle it again I would do a couple of things differently…
1. Not magnetize it. The theory was great, the implementation meant I couldn’t really attach the rider in a decent way, thus the way he is “surfing” on top of the spider. I don’t think it was really worth the sacrifice.
2. Paint the spider with the legs off. Holy crap what a pain in the arse it was. I attached them to get a proper fit of the spider on the base, positioning of the trees etc. but it led to many hours of frustration, and a half arsed job on the lower side of the spider.
As for things I think came out particularly well….
1. The colour choice. I really love it, I think the contrast of the eyes on the spider makes the model. With the rest of the models – spider, rider and base mostly contrasting on shade and saturation, having the eyes contrast on hue really makes them pop.
2. The rider tweaks. Having him with a chain and iron maiden is so cool. I think its ridiculous and I love it. His new shoulder pad is also so different to the giant skull and works pretty well.
3. The base. I love making bases, and this is one of my better ones. Being able to take what I have done on the smaller modls in the army and do it on a bigger scale is really cool.
That’s all folks, hope you enjoy the model… Until next time!
Ritual

‘Maw Krusha model is horrible and looks like a cabbage’ – Genius 🙂 I like your version much more mate, looks bloody brilliant in fact!
LikeLiked by 1 person
Looks great, I also think that yhe on foot version looks really nice!
LikeLiked by 1 person
That spider looks great. The face really pops. I wouldn’t worry about the underside too much, no one can see it and it would be in shadow anyway.
The weapon swap on the Orc is a great touch. The weathering is also fab.
LikeLike
Outstanding work, mate – the paint looks really nice, the overall cold scheme works a treat, and I love those bases, too! I’ll have to give the Vallejo chipping medium another go – just gonna toss the one I have and try with a fresh bottle and see how it works.
LikeLike