
For this post I’m going to cover an aspect of the Nurgle Knight that I didn’t expect to gain so much attention that’s very quick, easy and clean. In addition I’m going to cover a bit of what I did on the base too.
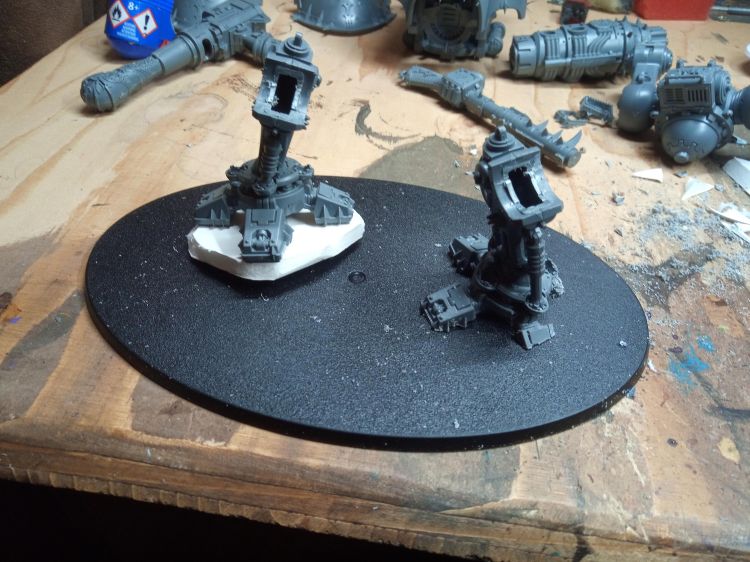
In fact lets start with that. This was a very different kind of Knight to the Khornate Knight I made. with that one I wanted it to look terrifyingly aggressive and fast, sprinting into combat. This one is Nurgle, so I wanted it to look very lumbering. That meant both feet on the floor, but both feet on the same flat plane, level with the table always looks a bit rubbish unless standing on some sort of structure. So I gut the feet of the knight and started positioning them unevenly, which included gutting way a slice from one foot to sink it in the ground. Then I started gluing the thighs on the knight and carefully offered them up to the knees so that it would be in approximately the right place and I could leave the upper legs to set. This was also a good way to gauge how to place the rest of the textures on the base. I marked these positions with a pencil then got on with the texturing.
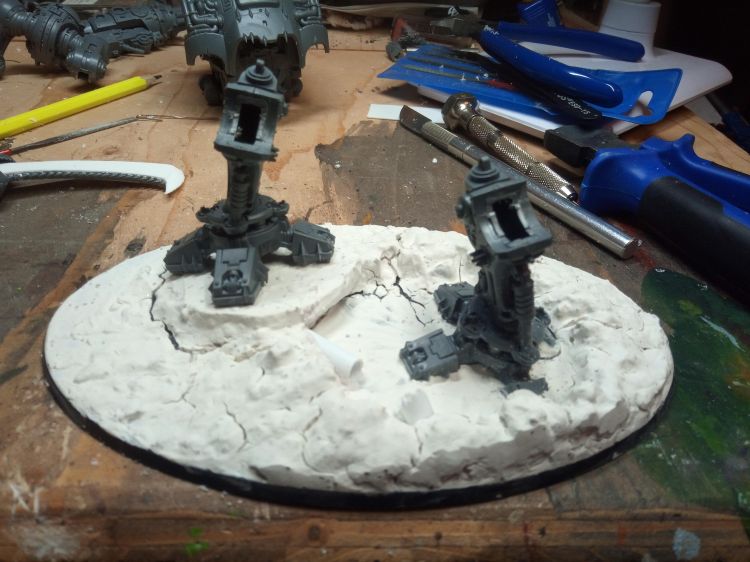
So here you can see where I used foam board to make the edges of the crater then made a mixture of polyfiller and PVA glue to coat oaver the whole thing to give it more of a stone like texture. This also had the cool side effect of creating cracks around the rock and crater which was unexpected but then I went out of my way to preserve later.

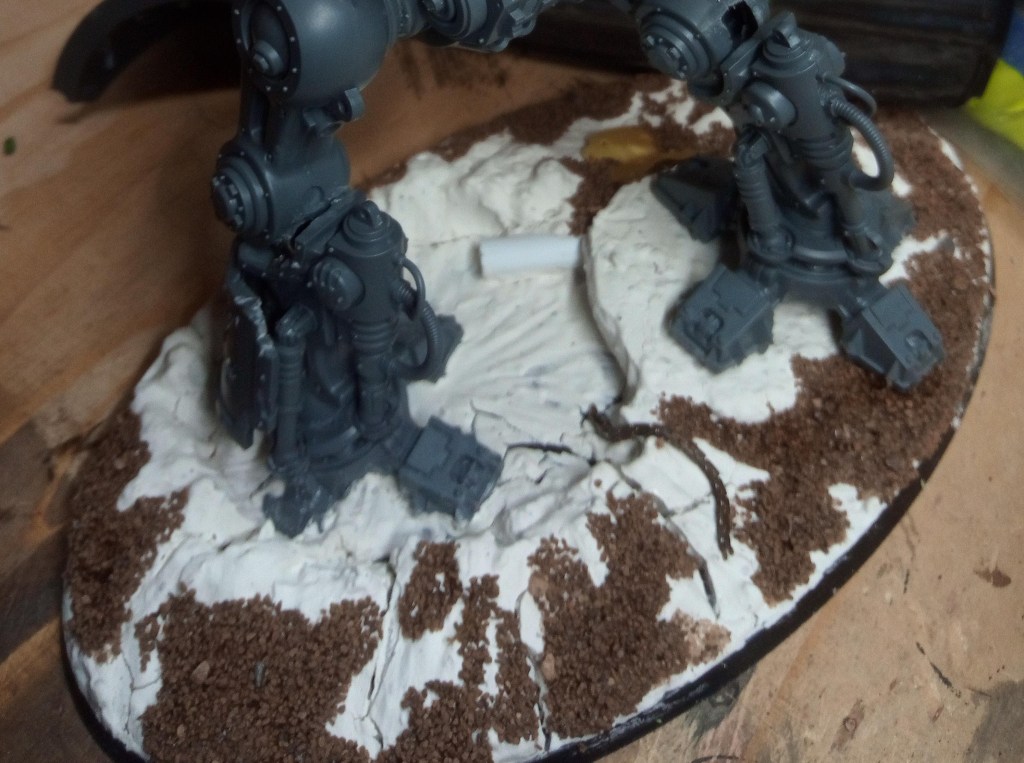
Next layer of texture was for me to throw down some basing material and bits of metal, just to break up the uniform texture. I also added a broken pipe to the crater to give Krakendoomcool the opportunity to do some cool water effects like he did with his helbrute.


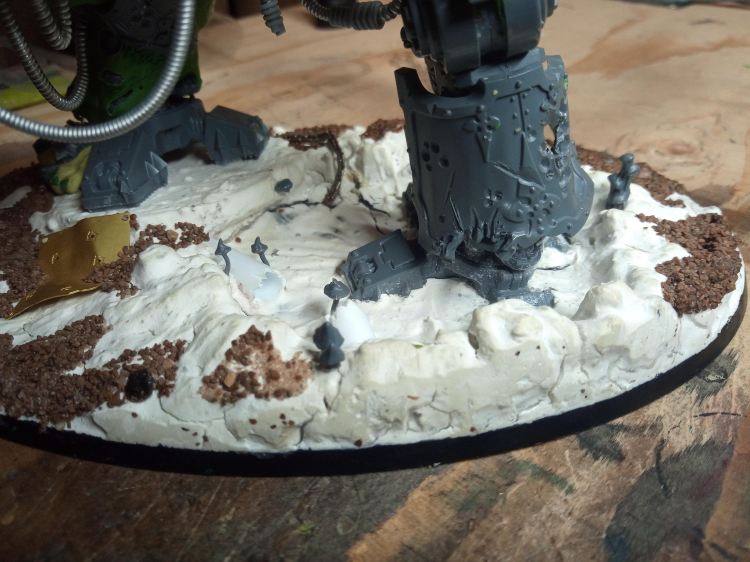
Lastly I got some mushrooms from the bases of some squig hoppers that Im making a bloodbowl team out of and added those to the crater. You see I wanted it to look like a crater that had been blown open prior to the knights arrival, but it kept looking to me like the crater was meant to have been made by the knights foot… and worse still was it looked like I had accidentally put his foot in the wrong place for that. I put mushrooms around the crater in the hope that it would add some age to it and demonstrate that it hadn’t JUST been made by the foot. With hindsight, maybe I should have had the foot crushing the edge of the crater, but then that might have made potential water effects harder without the well defined border. Anyway, the finished thing looked much like this but with some more mushrooms I think.
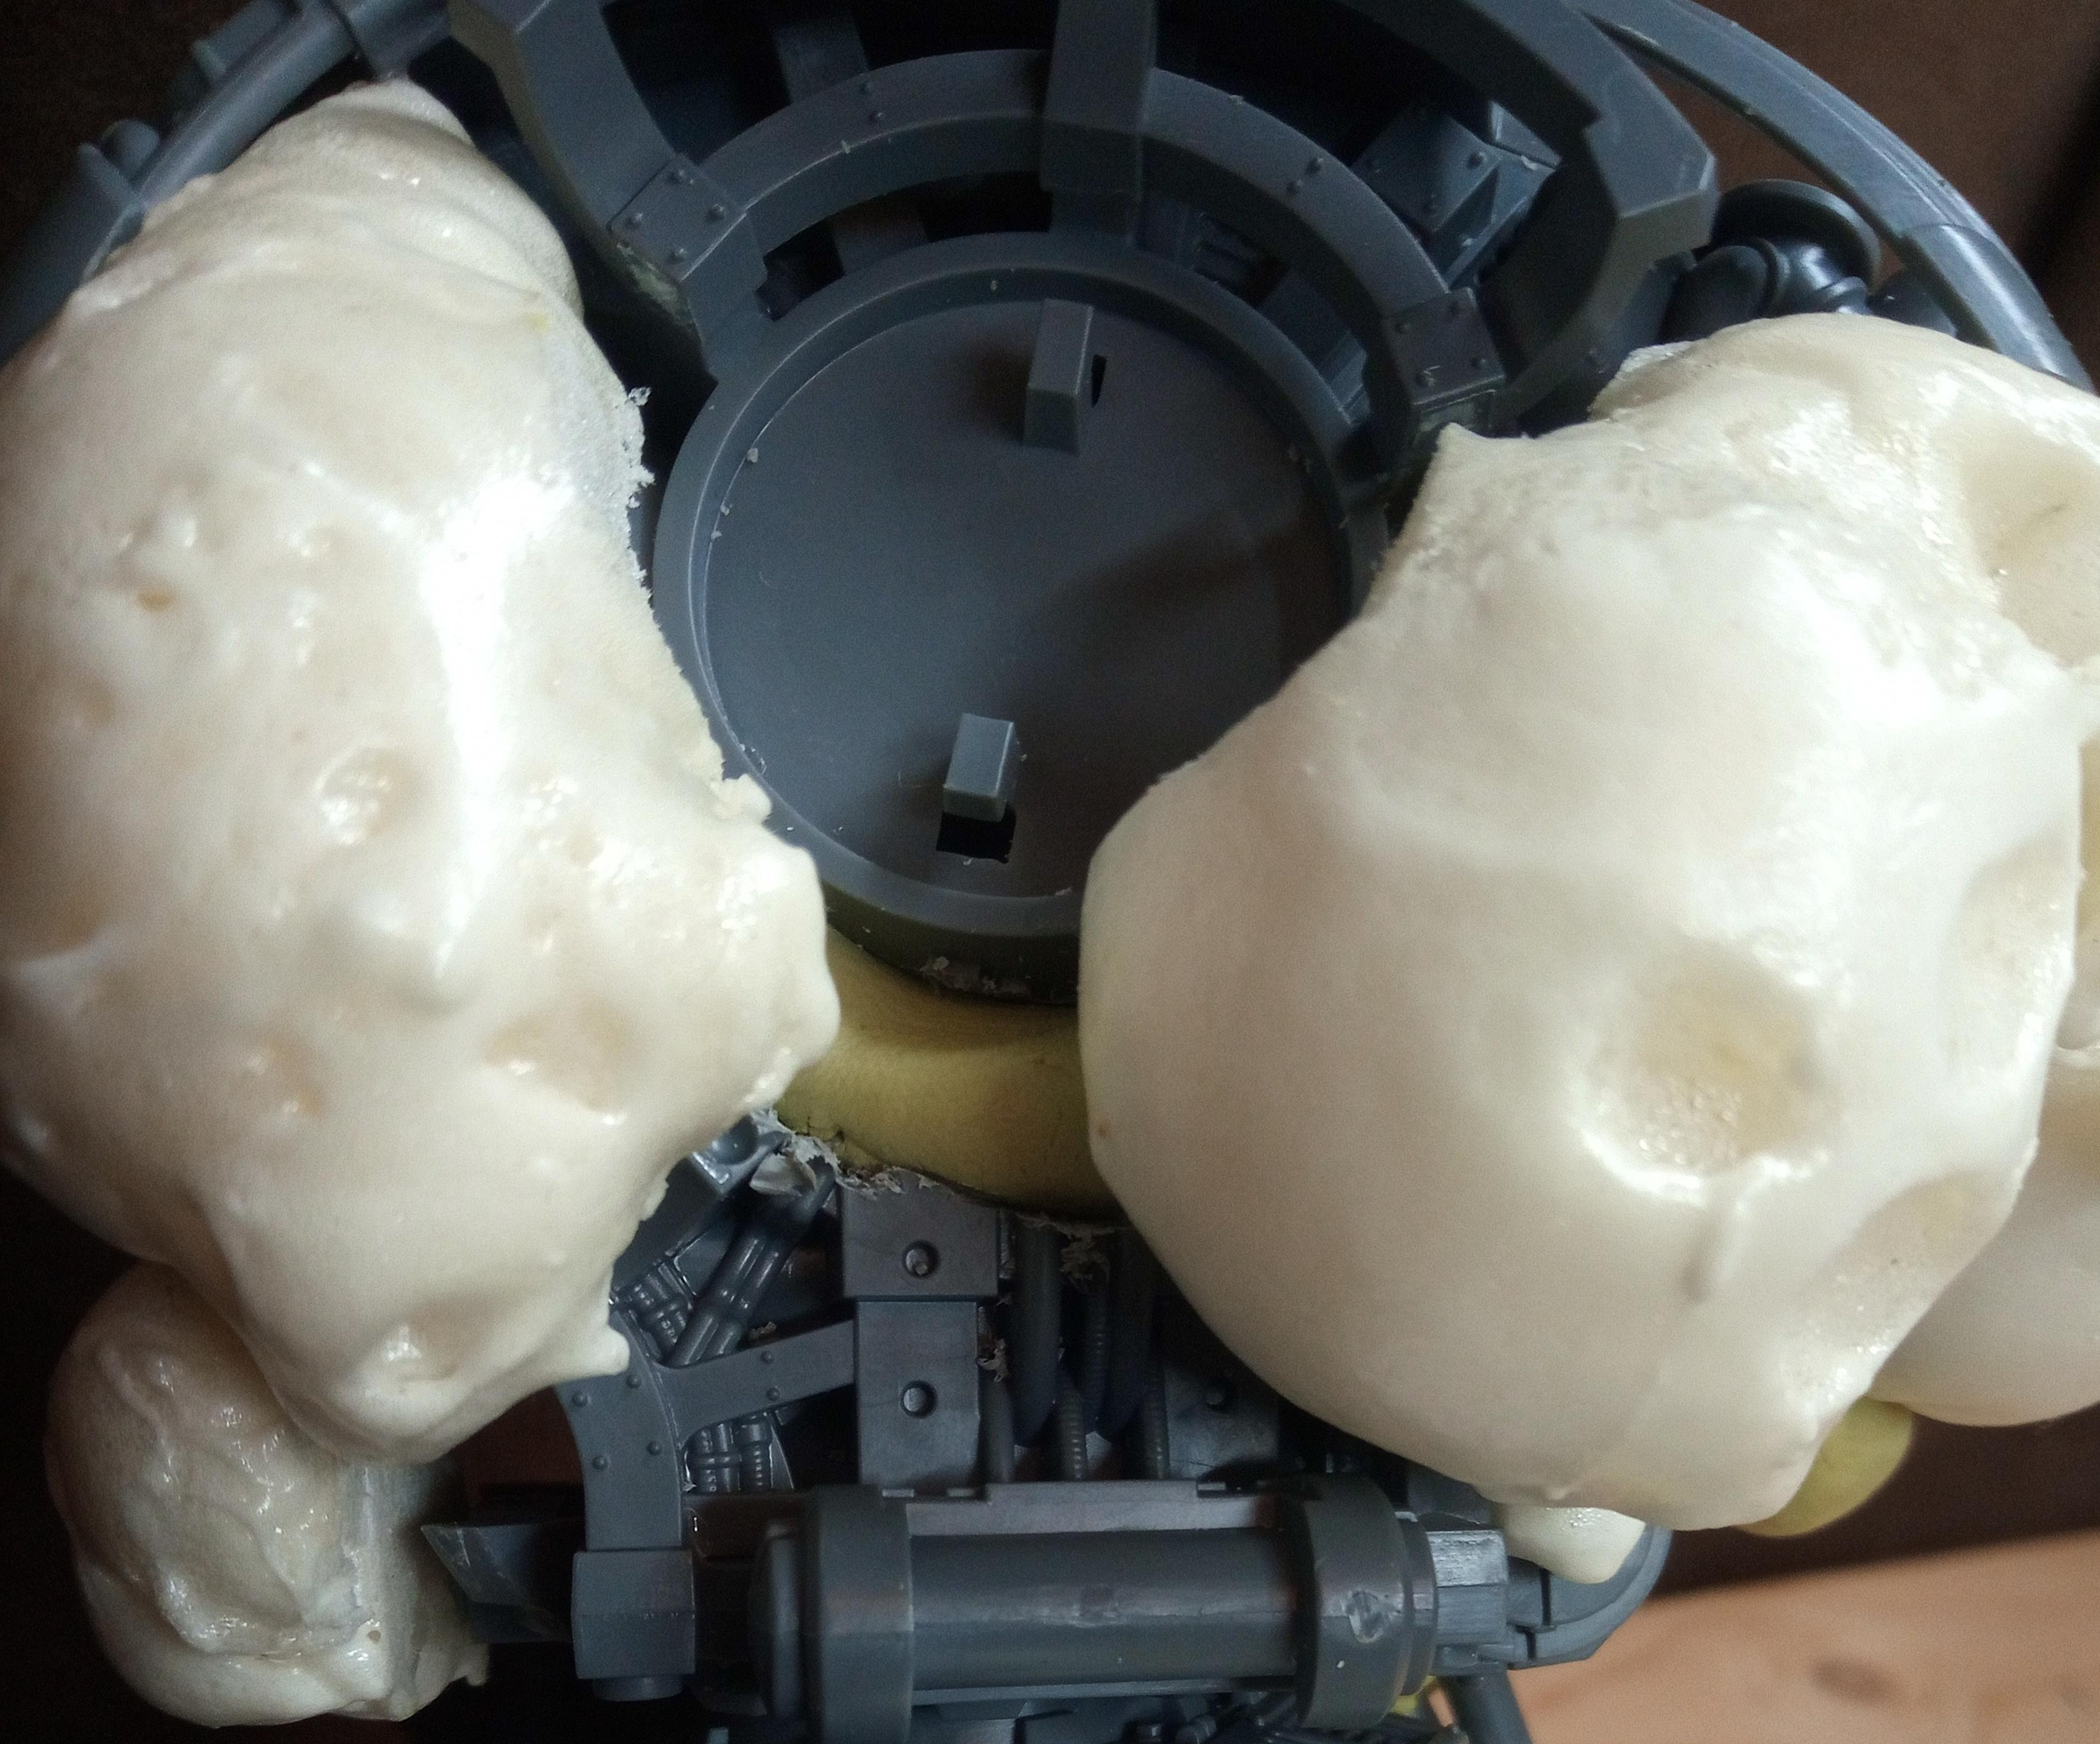
So, thing I was asked about quite a lot, the expanding foam. I covered this a bit in the main post with the finished model but without the details. I explained how I had seen people use expanding foam to make a cool looking Nurgle helbrute and decided I wanted to use this as a method for bulking flesh on the knight. I asked a few other people who were very familiar with Nurgle conversions what they thought about using expanding foam and they said in no uncertain terms “STAY AWAY FROM IT” on the grounds it was difficult to control and a nightmare to remove.
Unwilling to be swayed I had a think and had the idea of preforming some lumps of expanding foam for me to then pick and choose from to add to the model.
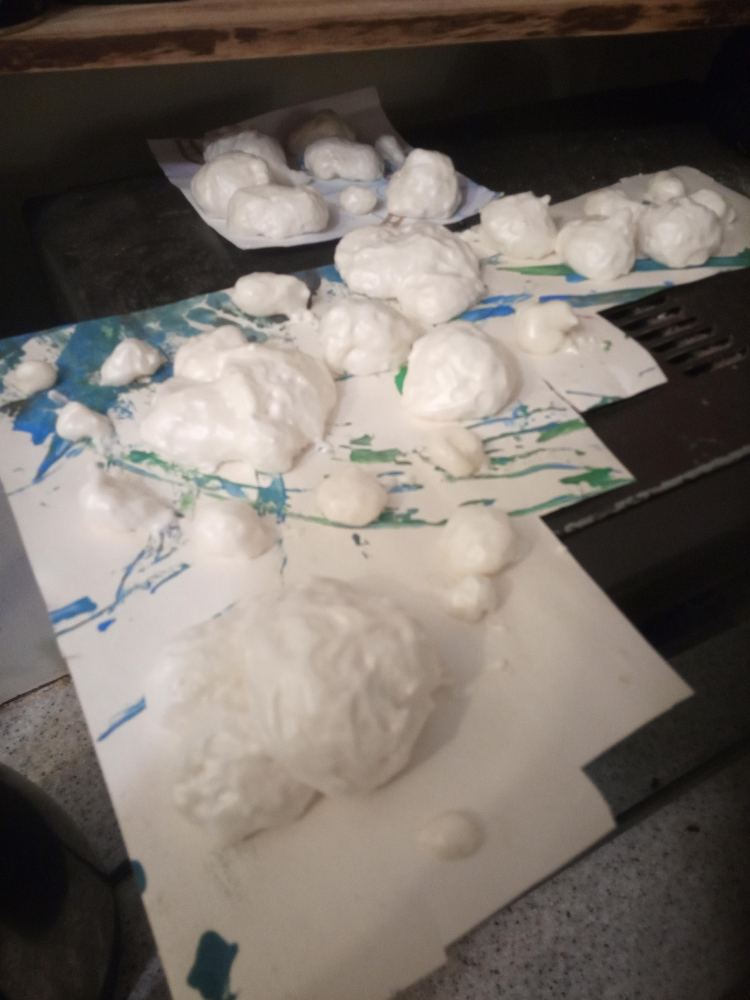


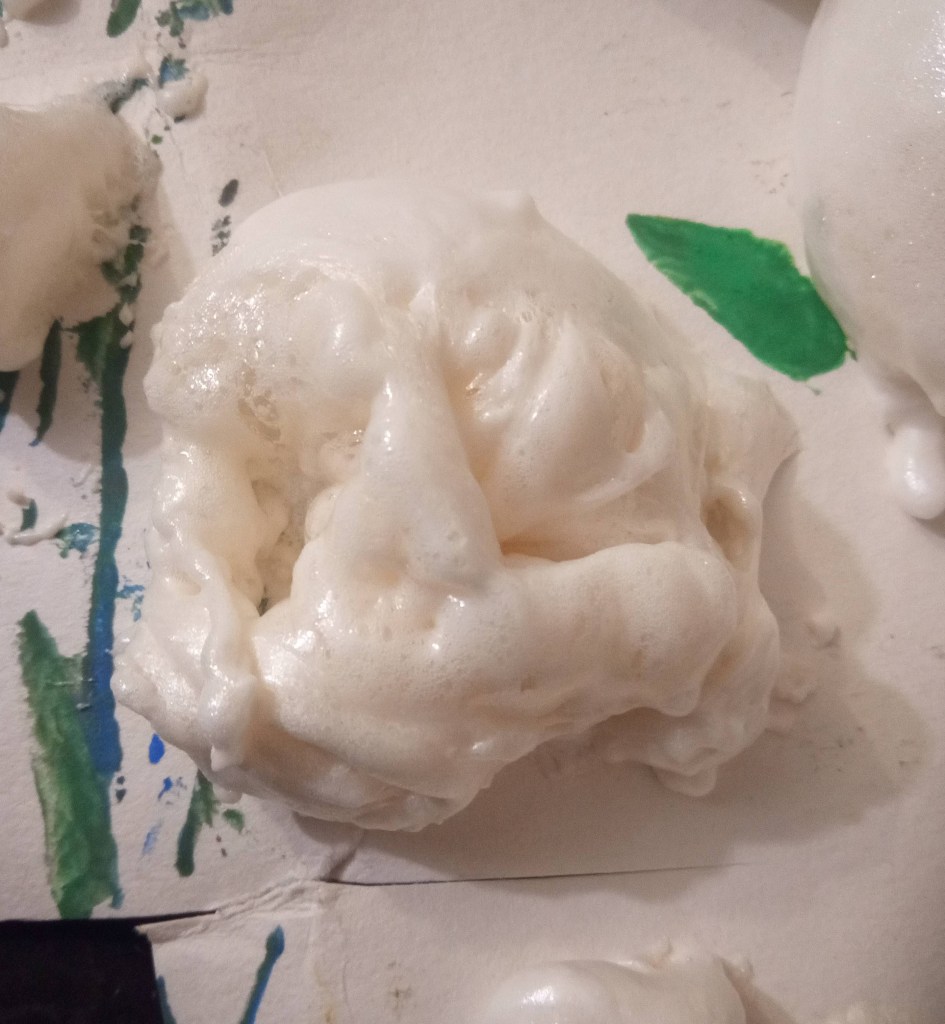
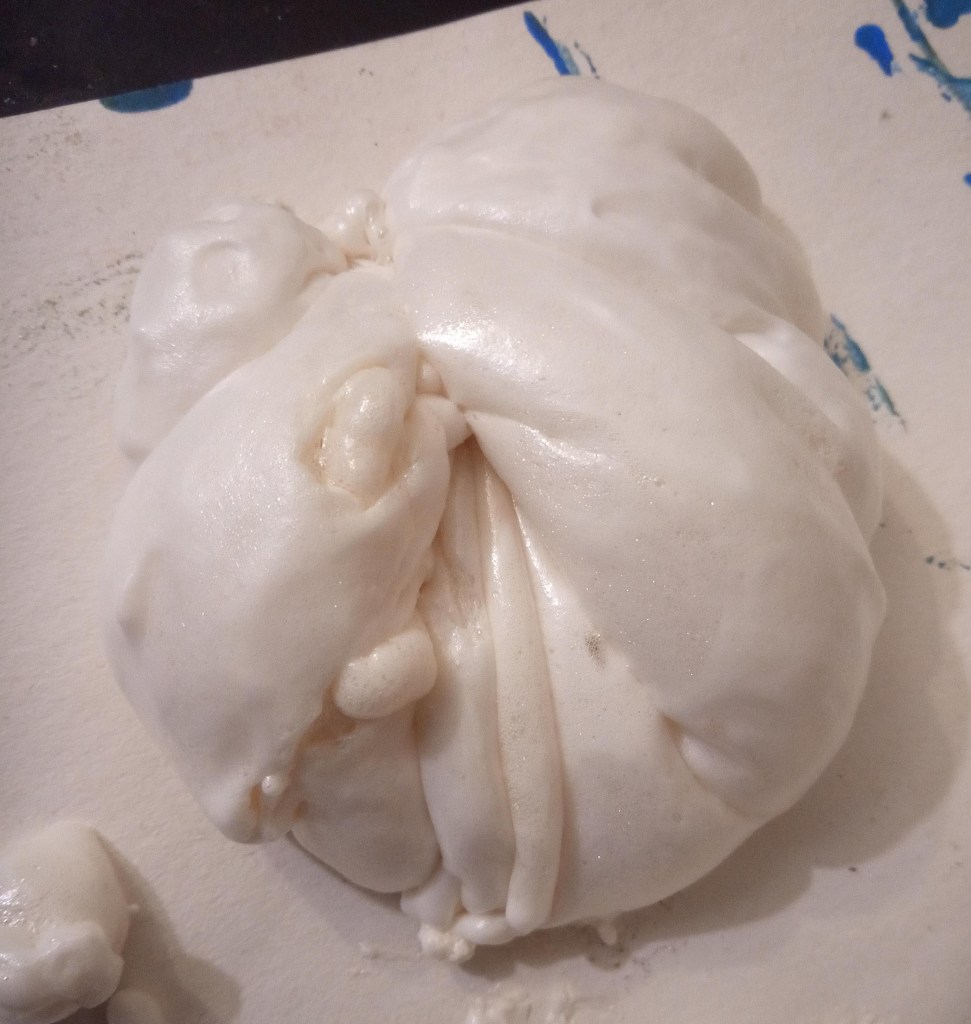
So those were some of my experiments with the expanding foam, some I did on a flat surface, others I pumped the foam straight onto the paper while it was pegged to a piece of string. by using a cocktail stick or wooden skewer you can create folds or pocked surfaces in the expanding foam. Granted, as I was told, this is very difficult to control, I couldn’t really repeat any sort of shape with reliable accuracy, but that was the whole point of this in the first place. I did loads then selected the ones that fit the model best but just offering them up and then cutting bits out of the back of them so they would conform to the surfaces I wanted to glue them too. they wouldn’t fit perfectly but I planned to gap fill with Milliput.
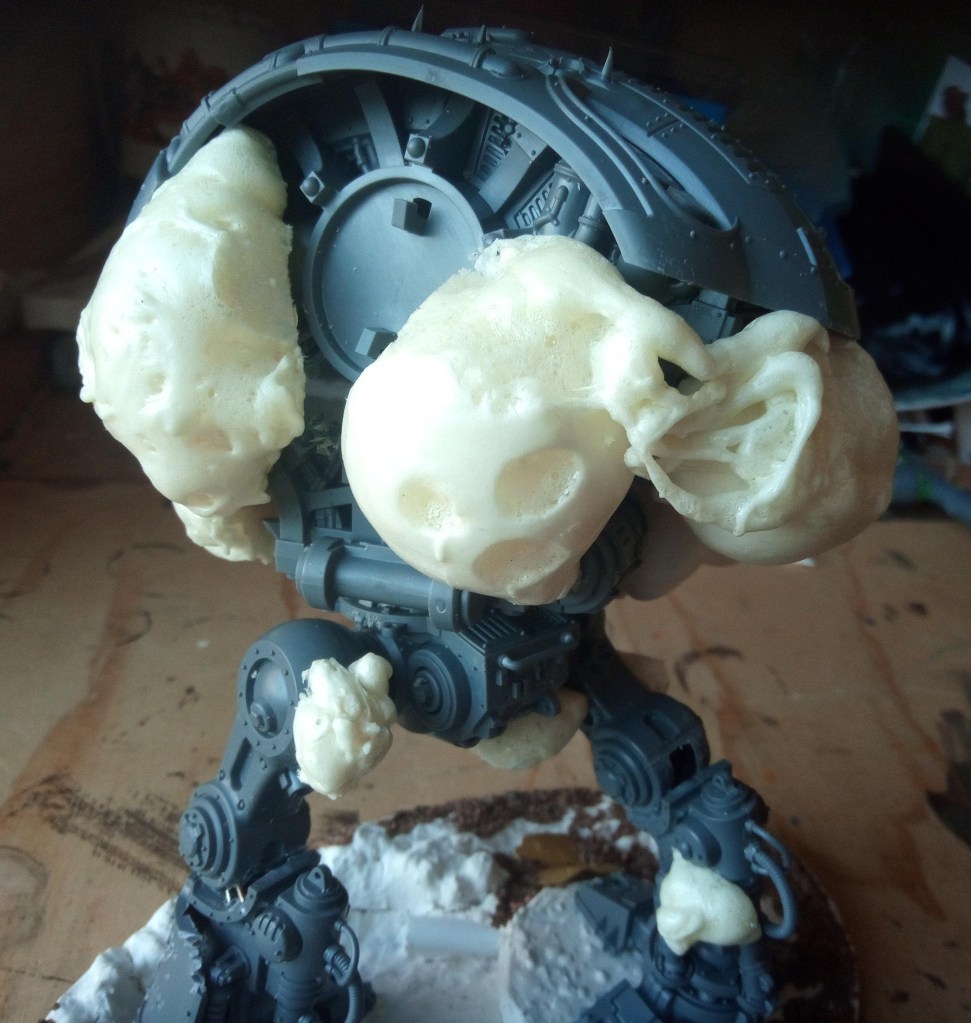


After the initial gap filling I had to do some more significant gap filling, which I did with some very rough shapes with Milliput. Content in the knowledge that these things may later be covered up or changed later, I just wanted to hide the holes and get an idea of how the over all shape would look.
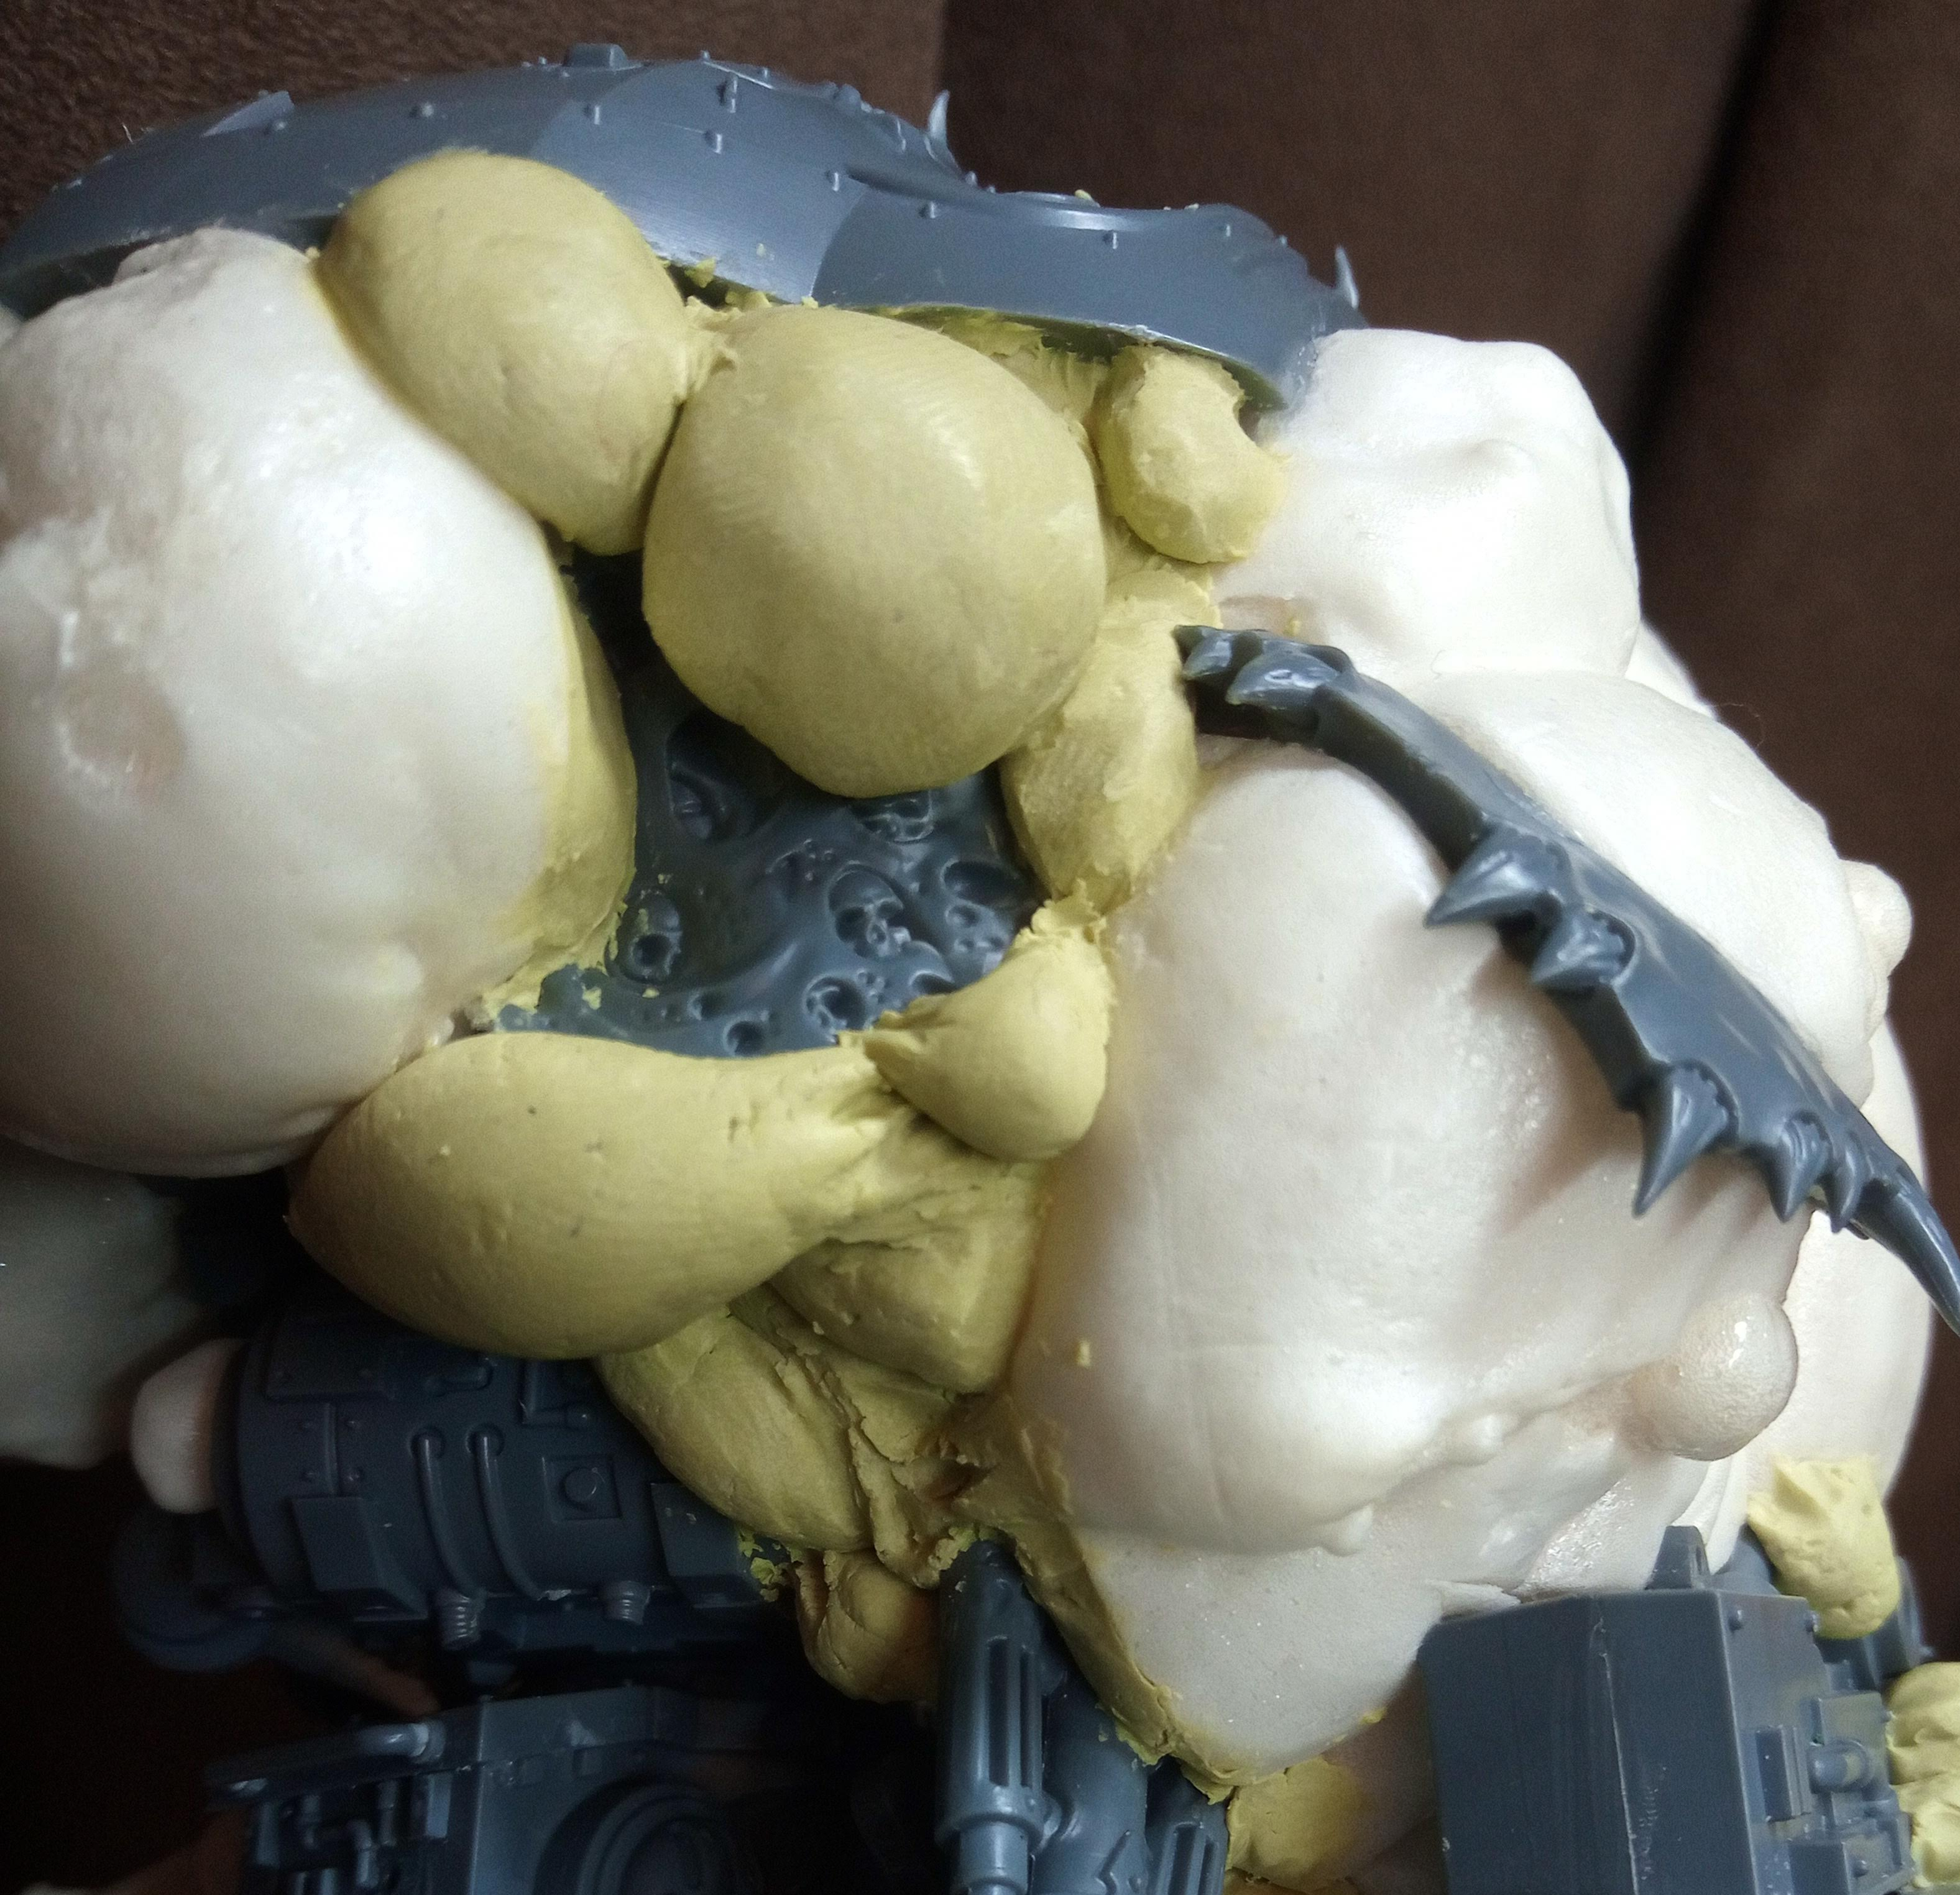

As you can see from this final picture as you start building up around it, it looks quite good. You can see where I had to repair a little broken piece with green stuff here but on the whole its reasonably sturdy, light and a lot cheaper than bulking with some sculpting material. You can also cut into it quite well, you can see here how I embedded some fuel tanks in the back of it.

That’t about it for this post, if you have any questions then please do ask, we love hearing from people in the comments, its really exciting to share ideas with everyone. I’m really happy with how well this worked out, my only real concern I wasn’t able to answer, is how well all the different materials blend into one another when painted. The expanding foam looks like it has a texture to it as its made of lots of tiny bubbles, maybe it will have subtle scaly texture to it… or, that might be an optical illusion seeing the bubbles through a smooth but slightly transparent surface! I wont know until it gets painted really and then we can learn from that. I don’t think it would be hard to ad some texture to the skin but it would be nice to not have to.
~Pandora’s Bitz Box~

What a cool technique! My first instinct was to let the thing expand over the model itself… and indeed that would be perilously chaotic! But you did such a good job at picking and preparing those pre-expanded bits that it totally looks like it still did!
LikeLiked by 1 person
I think it’s definitely worth doing it this way as puting it straight on the model is very much a one way trip. You would have to get it right first time and it behaves in an unpredictable fashion. Just try making some on paper first and see how it goes. You don’t even know what size you want or how big to squirt this out before they expand, it’s a lot to consider!
LikeLiked by 1 person
Have you tried letting it expand by itself over any of the bits, like pipes and such, or were they all carved in? I was thinking on having some chain wrapped around an expanding blob, likely half-sunken, and also forcing-like it overgrown the foam/flesh around it… One thing’s for certain, you got me the itch to experiment with it!
LikeLiked by 1 person
I didn’t, what I would be more inclined to do is let it expand, creat the creases and then after it’s solid, THEN wrap the chain around the crease. Worth trying it though, it’s the only way to learn is through experimentation
LikeLiked by 1 person
Granted! Although we all stand in the shoulders of titans… Not literally! The foam it’s probably not that sturdy!
Can’t wait to see how it takes the paint, and if it all blends well… I’d say it will… It looks a lot like adipose tissue as is… maaaybe some Typhus Corrosion or some other textured paint could fuse the milliput and foam in some areas, if needed… Worst case scenario, if the albedo or texture are too apparently different, with a little greenstuff “skin-cover” it’s guaranteed to look awesome as fat!
I’m very inspired by this! Going to hop on your shoulders and try some cheap gut fillings made of hot-glue/silicone poured on water to be added on the expanded mix… and maybe things that give it texture… fire and solvents…?
LikeLiked by 1 person
I think fire would be too extreme, a thinned solvent might be interesting but I think that would just strip the surface and make it porous, not necessarily like skin. Who knows though, I can’t really say these ideas work without seeing them in action. The idea with the glue gun into water is cool, if it looks like it’s defying gravity once you have applied it, you could just fire a heat gun at it carefully to get it to droop a bit.
Your Titan looks cool, what is it from? How “nurgley” do you want it to look? It has a sort of Eldar/forest construct look about it, presumably because of the helmet and curves.
LikeLike
It does look somehow Drukhari… Could also pass for Tzeentch…? Nurgly has to be… How much? Not sure… She’s a demon engine with an already corrupted pattern to begin with… A couple hundred years of service, maybe?
Really, it’s a mix of Skaven, Death Guard and McFarlane Cyber Units… Mid-tier Poorhammer.
LikeLiked by 1 person
Hang on, isn’t this a different one to the one you linked to before that was green?
LikeLiked by 1 person
Mine came in green… There were a couple possible colors, I know red it’s also out there, I think maybe black, too.

You might recognize the parts I used from that one… Mainly mixed with this other one:
LikeLiked by 1 person
Oh I see, so this is the base model and you added the parts To it, gotcha. If you compare the feet to that of the Wraith Knight you’ll see what I mean, just comparing the armoured panels in general.
You suggested you would be happy to make it not Nurgle, what is it you actually want to make? If you have an idea of the finished aesthetic you want we could knock some ideas around?
LikeLike
Oh, yeah… it does. A lot more “Gundam” and sleek than the usual Imperial templates… I already used quite some “Nurgle fluff” on her… Within my limited arsenal. The “base resources” to make another one are on the 60$ range… I consider this one thematically locked (plus it’s kind of the army/collection I’m going for) But considering how good you are with Grandfather’s blessings I’d love to know anything you could point to me to give it the “Impurity Seal”.
LikeLiked by 1 person
That’s fine. Well there are a few ways to go with Nurgle, biological rot and disease or mechanical failiure and degradations. So you could add like you say, intestines and fleshy tubes. You could make fatty lumps and gross textures, bit that depends on your bits resources or sculpting ability. Alternatively the mechanical degradation, drilling pock marks all over it, cutting off whole pieces of metal and making the edges all jagged and look as though they have rusted away. You could also do Nurgle with just the paint work, use crackle effect paint to make it look like flaking paint jobs, add in rust and leaking oils.
Fortunately I don’t have to worry about the paint job on this 😄
LikeLike
Awesome stuff mate – I want to play with expanding foam now… I’m not brave or Nurgly enough to use it on a model, but I fancy playing with it on some weird/chaotic fleshy terrain!
LikeLiked by 1 person
I originally got it for terrain YEARS ago… And only now have I used the cane 😂
LikeLiked by 1 person
*can
LikeLike
Great use of what seems to me a potentially crade technique.
Cheers,
Pete.
LikeLiked by 1 person
Yeah it’s very risky applying it straight to the model but this totally has merit
LikeLiked by 1 person
I love this model so impressive the level of detail on each of the parts is just unreal. The muscles and stretched flesh you added to the expanding foam really ties the model togeher.
The basing wow! I remember on one of our voice chats that you said you weren’t very good at basing. I think its fair to say the base is epic the level of detail and the cracked pipes on the base as example is just amazing!
I can’t wait to see Krakendoom prime the model 😀
LikeLiked by 1 person
Thanks man! its funny now we look at the basing, because to me what I have done isnt the same as what I was talking about. What I did here was to sculpt the ground, which I guess is part of basing, but what I mean is the subtle textures and stuff, I basically did the main theme of what I wanted then threw some basic basing material down and that was it, I left it pretty bare so that Krakendoomcool could base it more like his other stuff. I am happy with how it turned out but I dont normally put this sort of effort in, its always a bit easier on these bigger pieces than it is on the smaller ones, and interesting small bases are a lot more challenging and impressive in my eyes. : )
LikeLiked by 1 person