


Just before I start I should say that I made this in 2012 and I’m having to write this from memory. The other thing is that these photos were only meant for me to show to my friend, so I didn’t exactly take great care in taking them (plus I’m a terrible photographer). So, now that you’re forewarned, let’s begin!

First thing’s first, the design. Now this was the Tyranid drop pod, before there was any kind of official model. So I had read the description in the Codex, and I think there might have been an illustration in that Codex, too, which would have likely influenced this design. So I made a sketch in my sketchbook (pictured above) then a more final version drawn in photoshop. It was pretty quick.

With the design in mind I needed an idea of the size it was going to be. So I printed off the design on paper, but ‘actual size’. I then made a really quick card model, that you can see in this photo. Using that as a guide I cut a hard foam into squares and glued them together, making a cube of foam. I started with foam mainly because I didn’t want this thing to be really heavy.

I then cut and sanded the cube into this sort of egg/cone shape using a small hand saw and a sanding block. Once I was happy with this shape, I cut the bottom at an angle and I hollowed out a dip in the top. This is where the Tyranids would climb out.

There was no way I was going to get green stuff to stick to foam, so the next thing I did was I made a sort of slurry from milliput mixed in water. I painted this onto the model with an old brush. I may have done two coats, letting it dry in between. I then put a thicker layer of milliput on top of this and sculpted the sort of muscle fibres into it.

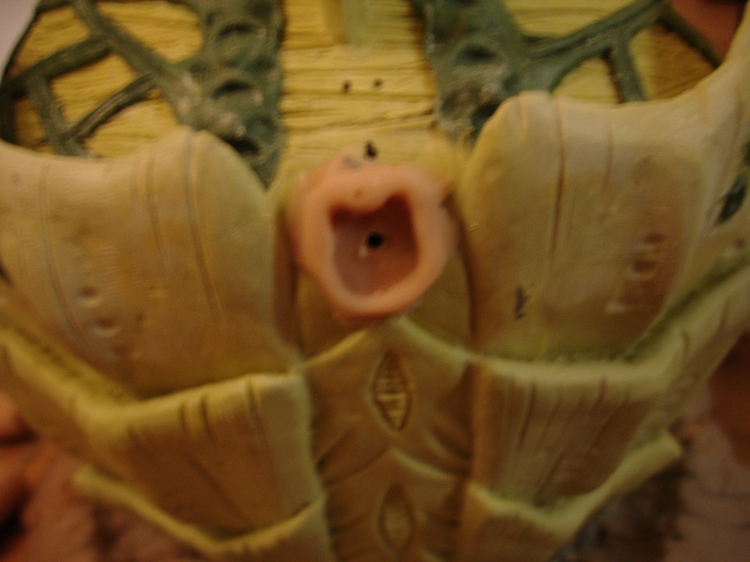
Next I sculpted the mouth of the drop pod out of green stuff. I added musculature for the teeth and added spines and tendons on top of the milliput layer.

Now, the armour! I started with a twisted length of tape around the pod’s circumference…I can’t remember why. I think it was to bulk it out. But after that I bent wire into the outline of the armour plates and fixed them in place with milliput which I cured quickly with a heat gun.

Now, I have to apologise as I have a gap in the photos. A few things happened here. I sculpted the armour plate, added battle damage to the armour plates using green stuff and I sculpted the teeth.
The armour plates were made from milliput, starting by covering the wire frame then working down from there. It was quite tricky so I didn’t get it right first time. I ended up having to work on it with a Dremel and sanding pads after it had cured to fix bad areas and further smooth it. I don’t really recommend this as it was pretty messy work. That said it’s a good plan B.
For the teeth I rolled out a thin length of milliput, cut into inch long pieces and pointed one end of each piece. I then draped them over a rolling pin (dusted in talc to stop the milliput sticking) to let them cure into a curved shape. You can see them in the background of the above image.

I then carefully drilled tiny holes into the blunt ends of the teeth with a hand drill, and glued wire pins into them which I then glued into the model. After a few seconds all the glue was dry and I bent the teeth into more dynamic positions. I wanted them to look like they were moving.

To finish them off, I used more green stuff to sculpt flesh around and between the teeth.


For the second layer of armour I started by getting the basic shape, again with milliput, then smoothing it with smoothing tools and my fingers.


Finally I used wet fingers, home made tools and clay shapers to get the final, smoothed out shape and added detail.


At this point I had made one set of these vents or whatever they are on the Tyranids backs. I finished them in the early hours but the next day on closer inspection I felt they were a bit too chunky and cartoony. Plus their size and shape seemed to betray the idea that this was meant to be a massive structure…so they had to go!


For the new set I started with a wire frame again, twisting them in the middle to give the milliput something to stick to. I cut a card guide this time to make sure I kept the size and shape I wanted.


I roughly stuck a few blobs of milliput onto the frame keeping it as thin as I could. I cured this with a heat gun quickly and packed on more milliput, this time sculpting the shape a bit.


I felt they were getting a little thick again so cured them and used a dremel to thin them out, then carried on sculpting.


Once these had cured overnight I glued them into place on the model. Then I packed the gaps with milliput and blended it in and added detail.


Now the base! At first I was going to cut a base from plasticard and glue scenery to it, but I bought super sculpy not long before and was all excited to use it…so that’s what I did!

After it had cured, I pinned the base to the model and added more details.


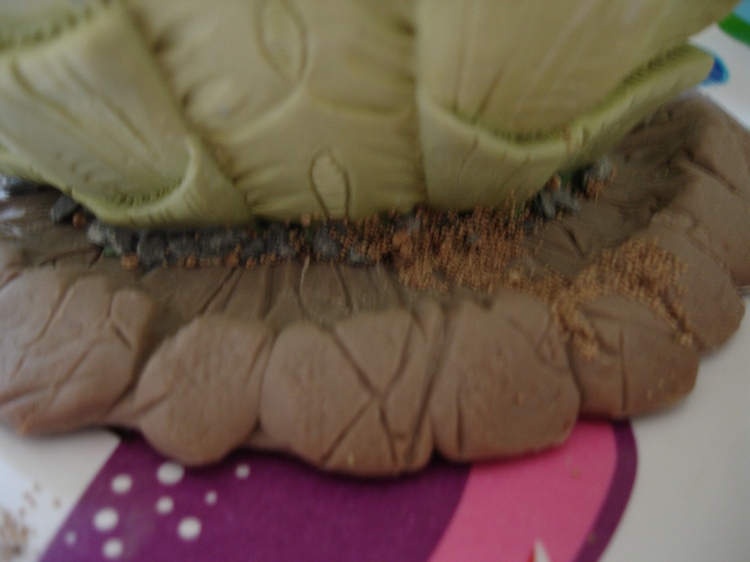
I stuffed the gaps between the base and the model with green stuff then sculpted it into rocky shapes. After that I added some stones and sand. And that was the base done. Next was the tentacles!


For whatever reason I decided to make the tentacles from super Sculpy. I started with two lengths of wire, twisted together so as to give the Sculpy a rough surface to cling to, but also to add strength to the wire. Then I sculpted on the Sculpy and cured with a heat gun.


I wanted these tentacles to be removable as we all know what it’s like trying to pack an oddly shaped mini. So I decided to make sockets that the tentacles would slot into.
I marked where I wanted the tentacles by drilling a hole for the excess wire to slot into, then I glued pins around the holes and pressed a blob of Sculpy onto them. Next I pressed the tentacles into the soft Sculpy so I had the shape of the socket.

I knew I was going to sculpt more detail on top of this so I cut away the excess Sculpy and cured what was left.
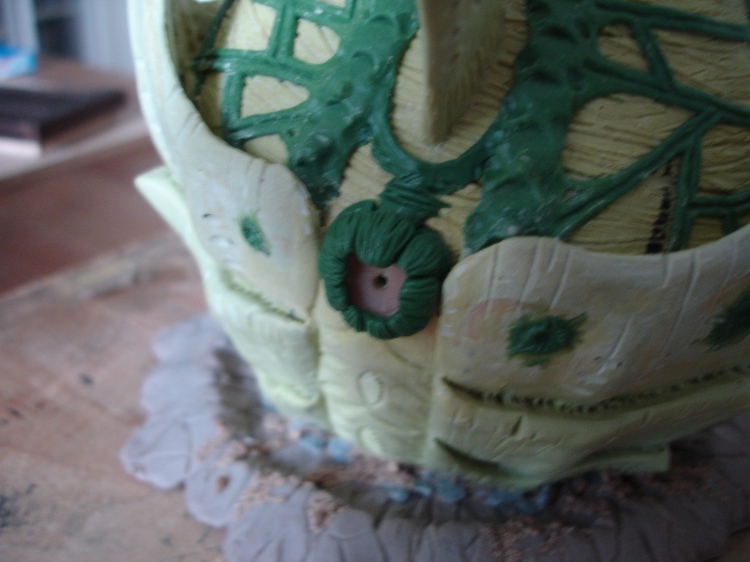

Next, I reinserted the tentacles and started to green stuff musculature around the sockets. I wanted it to look like the tentacles could retract into the pod until it landed. We don’t want them burning up in the atmosphere, right? So I sculpted the muscles a bit like the mouth of the pod, like a sphincter that could open and close when needed, protecting what was inside.


Once the muscle was finished I used green stuff again to add a protective skin or hide.


And finally, I cut the talons off some Hormagaunts I bought and glued them to the ends of the tentacles before using green stuff to bridge the gaps.

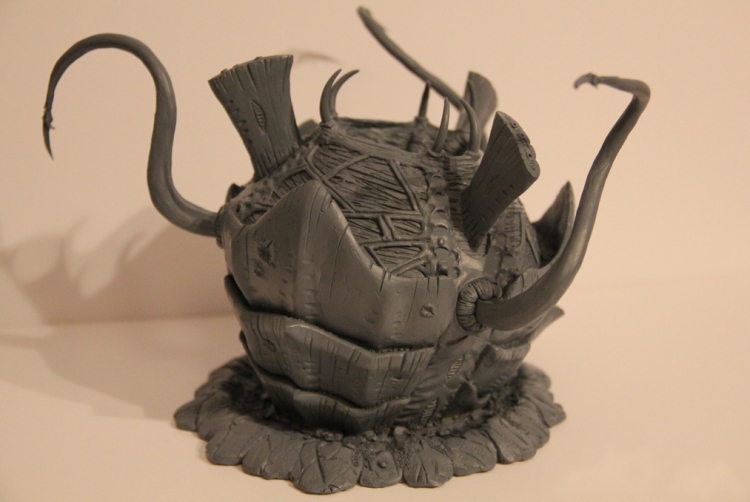
And that was that! As you can see I was all over the place with materials and techniques which was down, in equal parts, to not knowing what I was doing and being excited to try stuff out. But hopefully it was worth reading and maybe you got something out of it. All that was left to do was to prime it with grey primer so that it looked finished, and to hand it over to the birthday boy.
David 🙂
PS. Below is a quick look at what my workstation (kitchen table) typically looked like. In case it’s interesting to anyone.

And here are some pictures of the awesome paint job done by Pandorasbitzbox:


That is incredible, I think its better than the current GW one
LikeLiked by 1 person
Thanks very much! I don’t know about that but I was pretty proud of it when it was finished 👍
LikeLike
Wow- that is really impressive.
Cheers,
Pete.
LikeLiked by 1 person
Great work!
LikeLiked by 1 person
I love that I have this. I was so blow away when you first got it for me, I thought you had bought me some sort of third party drop pod. I was so cited when you said you built it. I love how many different materials you used, it’s like a showcase of how each thing performs. So very cool… Also nice to be on the receiving end of a Conversion a gift, esspecially one so elaborate
LikeLiked by 1 person
Just wow…. that is brilliant mate – high fives!
LikeLiked by 1 person
Really great to have this up on the blog. I love this model. I was convinced it was some kind of third party sculpt. I love seeing what you did to achieve this. It’s next level. Not just some scratch build but a full sculpt of an organic creature! I love the sketch, that and the whole thing is so pro!
Do you still have plans to sculpt a Nurgle Daemon Prince? We are going back a while but I’d love it if that idea came around again and would be interested in any sketches too.
Great job!
LikeLike
Amazing work – that is very, very cool!
LikeLike
Thanks, Azazel.
LikeLike